
Add a warehouse and its zones
- How-to
- Warehouses
- Who can do this: Admin, Warehouse Manager
- Checked on 27 October 2026
Create a warehouse with its Warehouse Code, add its zones, name its Warehouse Managers and set the order pickers walk the zones in.
In short
To set up a new warehouse, go to Warehouses › Warehouses, select New Warehouse and enter its code and name. Then add each zone in Warehouses › Zones with New Zone, and set the order pickers walk them in.
Before you start
You need to be an Admin or a Warehouse Manager. If you don't see New Warehouse, ask an Admin.
Only an Admin can name a warehouse's Warehouse Managers. Have the warehouse's address and a list of its zones to hand, such as goods in, pallet racking and pick faces.
Decide first
- The Warehouse Code. It is 1 to 4 capital letters or digits, such as
W1orCOL, with no hyphen or space. It starts every Full Location Code and every delivery number, such asINB-COL-000023. Once a delivery has been booked in under it, it can't change, and no other warehouse can ever take it. For one warehouse,W1works well. - The zone codes. Keep them short, such as
GIfor goods in andPRfor pallet racking, because they are in every Full Location Code. You can change one later: the Full Location Codes in the zone change too, but the barcodes on its labels don't.
Steps
Add the warehouse
- Go to Warehouses › Warehouses and select New Warehouse.
- Enter the Code and the Name. Lower-case letters become capitals.
- Under Address, enter the warehouse's address and contact details.
- Select Create. The warehouse shows in the list, with Active ticked.
Name its Warehouse Managers
- Admin only: in the warehouse's row, select Actions, then Name Warehouse Managers.
- Choose one or more people in Warehouse Managers. Only Warehouse Managers and Admins are offered.
- Select Submit. Their names show in the warehouse's Warehouse Managers column.
Add its zones
-
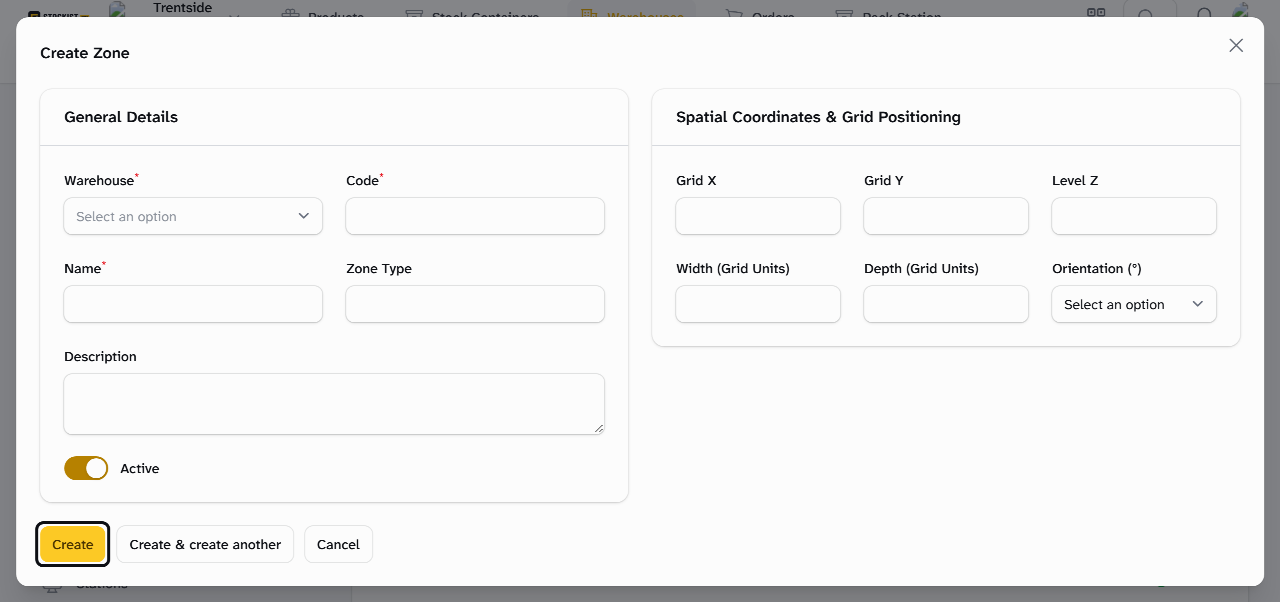
Go to Warehouses › Zones and select New Zone.
-
Choose the Warehouse, then enter the zone's Code and Name, such as
PFandPick Faces. -
If you like, enter a Zone Type, such as
Picking, in your own words. -
To draw the zone on the floorplan, enter its Grid X, Grid Y, Width (Grid Units) and Depth (Grid Units).
-
Select Create. Repeat for each zone.
Set the Zone Walk Order
- Go to Warehouses › Warehouses. In the warehouse's row, select Actions, then Set Zone Walk Order.
- Put the zones in the order pickers walk them, using the arrows beside each one.
- Delete any zone nobody picks from, such as goods in. It is then walked last.
- Select Submit.
What happens next
Create the zone's locations next: Create many locations at once for racking and shelving, and Add or change a location for single ones, such as dock doors.
Before orders can be released to the floor, the warehouse needs a Red Tag Location that is Active. Until you set the Zone Walk Order, pickers walk the zones in code order.
Still stuck? Email [email protected]