
Pack an order at the Pack Station
- How-to
- Dispatch
- Who can do this: Admin, Warehouse Manager, Floor Supervisor, Warehouse Operative
- Checked on 3 November 2026
Scan the order's tote at your Pack Station, pack each unit into a box or mailer, close each parcel with its weight, and handle the bench's checks and problems.
In short
On your Pack Station's screen, scan the order's tote. Scan a box or mailer to open a parcel, scan each unit into it, and close it with its weight.
Before you start
You need to be a Warehouse Operative, a Floor Supervisor, a Warehouse Manager or an Admin. Work at the screen linked to your bench's Pack Station, such as Bench 1. On a screen that isn't linked, Pack Station says "This screen isn't linked to a station yet". Ask a Warehouse Manager or Floor Supervisor to link it: see Link a screen to its station. For signing in and reading the screen, see Work at a station screen.
The order must be picked, with its Pick List finished. Your warehouse's boxes and mailers must be on its list of Packaging Items: see Set up Packaging Items and their costs. Keep their barcodes on a packaging sheet at the bench.
Keep the bench's printed Bench Commands to hand. A Quantity Override or a unit Missing from Tote needs a Floor Supervisor or above at the bench.
Steps
You can type any code into the scan field and select Enter instead of scanning it. While the scan field is empty, the number keys pick the numbered tiles and choices.
Open the order
Sign in on your bench's screen, or go to Pack Station on it. The screen knows which bench it is, so you don't scan the bench's code.
-
Scan the order's tote, such as
TOT-000035. The tote's lines show on the left and the order's parcels in the middle. -
If the client takes a Packing Slip, it prints as you scan the tote:
Its packing slip is printing: put it inside parcel 1.
-
Read the client's rules on the right. They give the capture point, packing slip, sender name, carrier service and its limits, and Must-Ship-By. On a tablet, select Client to see them.
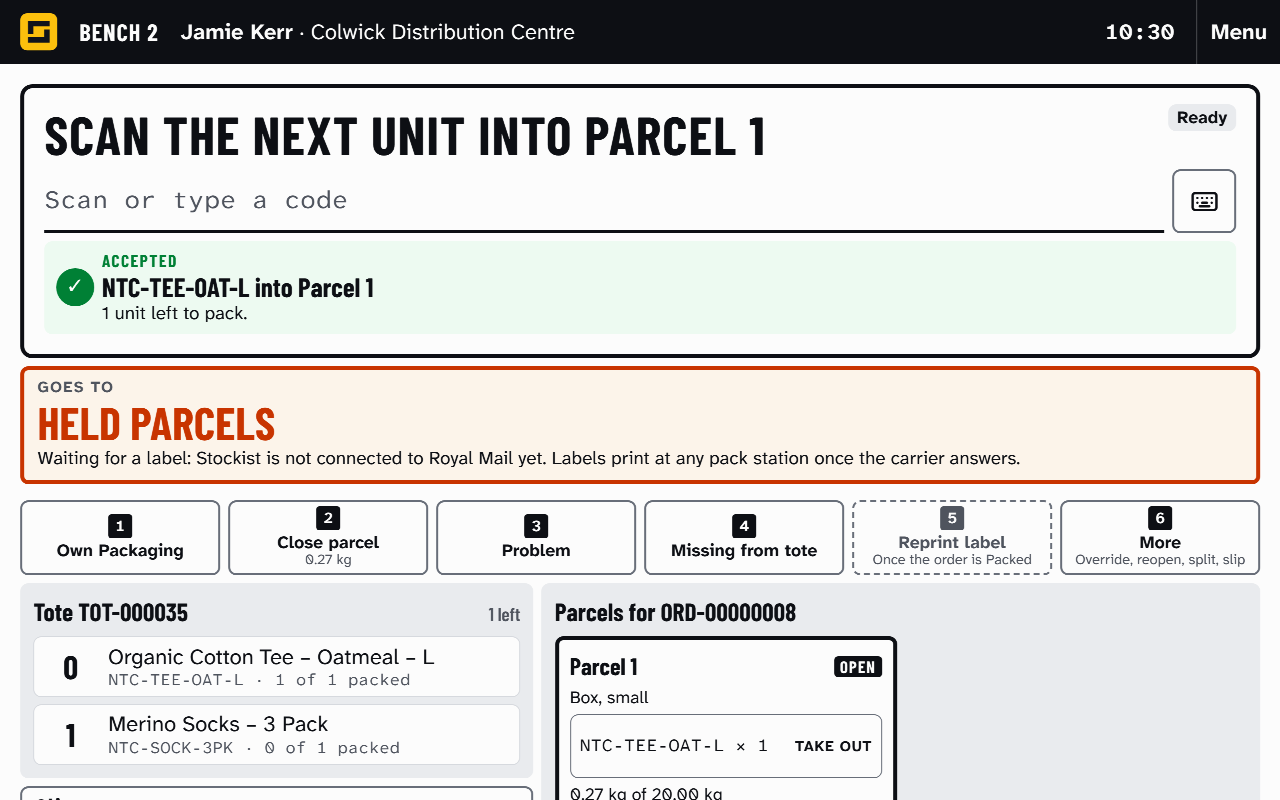
The Goes To sign, under the instruction card, always says where the parcels go next.
A tote still on an unfinished Pick List is refused as Not picked yet. An order In QA is refused, and the Goes To sign names the QA Checker: take its totes there.
The screen never opens an order by itself. While an order is on the bench, another order's tote is refused. To carry on with the order on the bench, scan its tote, its Transaction Number or a parcel label.
Fill a parcel
- Scan a box or mailer from the packaging sheet, such as
PKG-BOX-S. A parcel opens in it. - For a product that comes in a box fit to post, select 1 Own Packaging or scan
CMD-OWNinstead. It goes in as it is, one product per parcel: see Own Packaging. - Scan each unit into the parcel. When it says Scan its lot or Scan its serial, scan the lot or serial on the unit's label.
- For inner packaging, such as void fill, scan its barcode and type how many. OK with nothing typed records 1.
- When every unit is packed, select 2 Close parcel or scan
CMD-CLOSE. - Weigh the parcel and type its weight in grams, such as
420. Or select OK with nothing typed to close it at its Expected Weight. - For another parcel, scan another box and repeat. Once every unit is packed, the order is Packed and its labels print: see Stick and scan the labels.
If a print fails, the screen says why. Select Try again, Print in browser or Later: packing carries on either way.
The bench's checks
Stockist checks each scan and each parcel as you close it.
- Weight: a weight too far from the Expected Weight asks you to check what is in the parcel. How far is the Weight Check Tolerance. Select Weigh again or Confirm the weight. A confirmed difference is kept on the parcel.
- Weight limit: a parcel over its Carrier Service's limit shows a warning on its card, with the Suggested Split. Select 6 More, then Take out the Suggested Split, and pack those units into a new parcel.
- Size limit: a parcel over the service's size limit is refused. Use a smaller box, or ask an Account Manager or Warehouse Manager for a Service Change.
- Required Packaging: another box than the client's Required Packaging asks why. Select 1 if it has run out, or 2 if the order doesn't fit it. Select 3 if the client agreed something else, or 4 Other and type why. Select Cancel to scan another box instead.
- Extra units: a unit scanned after every picked unit of its product is packed is refused as Already packed. The screen asks "Is there one more unit than was picked?". Select 1 Put aside as an extra unit and put it on the Return to Stock tray. If the scanner read one unit twice, select 2 Not an extra: it was scanned twice, or Esc. Nothing is put aside then.
- Lot or serial: a lot or serial that disagrees with the pick stops the order and sends it to QA. The open parcel's units go back into the tote, and a packing slip prints. Put the slip into the tote and take the tote to the QA Checker.
Take out or reopen
- To take an item out of the open parcel, select its line, marked Take out. One unit goes back into its tote, still kept for the order: see Take Out.
- To change a closed parcel, select 6 More, then Reopen a parcel. With several closed parcels, choose which one. Bring it back to the bench first if it has left.
- A parcel with its labels on needs a Floor Supervisor's approval, as for a Quantity Override. Reopening it cancels the order's labels. Peel each old label off and scan it: see Cancel labels. The order's timeline names you and the Floor Supervisor who approved, and says when they used their Staff Badge. If the carrier can't be reached, the screen says Carrier not answering and nothing is cancelled. Try again in a few minutes.
Closing a reopened parcel records it again: see Reopen.
Count several units in one scan
For units you can count but not scan one by one, such as 12 bags in a carton.
- Open a parcel first. Select 6 More, then Quantity Override.
- Type how many units the next scan of a product counts, from 2 up, then select OK.
- A Floor Supervisor or above approves at the bench. They scan their Staff Badge, which the screen never shows. Or they select Sign in instead and type their email and password. If they are the one signed in, they select Approve as with their name.
- Scan the product once. That scan counts the approved number of units.
Serial-tracked units are always scanned one at a time, and a Quantity Override can't go into Own Packaging. To cancel a waiting override, choose Quantity Override again.
If an approval is refused, the screen says Not approved with the reason and asks again. Five wrong tries in a minute make it wait 60 seconds.
A unit is missing from the tote
- Pack every unit you can find first.
- Select 4 Missing from tote. It lists the units the tote still holds on the books.
- A Floor Supervisor or above searches the tote, the cart and the bench. Then they approve it, as for a Quantity Override.
- Follow what the screen says next. When the unit is picked again from other stock, take the tote and any parcels to the Red Tag Location. One is
COL-DS-RT-01. - Scan the Red Tag Location. The order waits there for its re-pick, and the bench is clear for the next tote.
If no other stock is found, Stockist puts the rest on backorder or red tags the order. It says what to do.
Something else is wrong
- Select 3 Problem.
- Choose the Red Tag Reason, such as Damaged after picking. For Other, type a note: only staff read it, never the client.
- A packing slip prints for the tote. Put it into the tote.
- Take the tote and any open parcel to the Red Tag Location, such as
COL-DS-RT-01, and scan it. Stockist unpacks any open parcel into the tote on the books.
A Floor Supervisor then decides what happens to the order: see Resolve a red tag.
A tote holds several orders
A batch tote holds one unit for each of several one-item orders, from a Batch List. Scanning it opens a Sort Wall in the middle column instead of an order.
- Scan the batch tote. Each order has a numbered card with its client, product, Rush and ships-by time. It also shows how many units are placed, such as "0 of 1 placed". It says where the order stands and where its parcel goes.
- Take a unit out of the tote and scan it. If the screen says Scan its lot or Scan its serial, scan that first. Stockist names the order, Rush first, then the earliest Must-Ship-By. That order's card is highlighted and marked Complete.
- Scan a box or mailer, or select 1 Own Packaging. The unit goes straight in, with no second scan.
- Close the parcel, then label it and send it on as usual.
- Scan the next unit out of the tote. You don't scan the tote again. The wall closes when the tote is empty.
A unit for a red-tagged order prints its packing slip. Take the unit to the Red Tag Location and scan it. A unit for an order waiting for its QA Check prints a QA slip and goes back into the tote.
What happens next
When the order is Packed, its labels print at the bench. Stick each on its parcel, scan it, and take the parcels where the Goes To sign says: see Print labels, use Held Parcels and make a Manual Label.
From there, the parcels go into the cage for their collection: see Load and close out a collection.
Still stuck? Email [email protected]